Snoot Showdown - Which is Best for You?
May 27th, 2016
Snoot Showdown
Which snoot is best for you?
Reefnet | 10Bar | Retra | Video Reviews | Final Thoughts
Underwater photographers sometimes employ a creative lighting tool called a snoot. A snoot is simply a tube or device that is used to form a narrow beam of light. For underwater photography, we use them over our powerful strobes, taking the 100° beam of bright light and focusing it down to a small circle or point of light. This allows a photographer to create striking images by lighting up one small area of the scene, or highlighting one area of a creature while the rest of the composition falls to black. Its helpful, too, for creating those dramatic black backgrounds, even when you have a subject that is positioned in an area where that style of lighting would be otherwise impossible.
There are several different snoot options on the market, so how do you choose the right one? Let's take a look at the top three options around, with pros and cons for each version.
Reefnet Fiber Optic Snoot
 The Reefnet snoot has been around for a long time. Its a very simple design, created from a 3D printed strobe mount, locline arms and fiber optics. The big benefit for this snoot over a homemade version is the fiber optics. a large bunch of packed cables transmit the light down a longer flexible arm, allowing for more light transmission and more flexibility for positioning the point of light. Without the fiber optics, the arm would have to be straight in order for the light to travel through the locline. This allows you to fine tune positioning by bending the arm to point exactly where you want it to without having to make larger adjustments to the strobe position. In addition the Reefnet snoot is the only one that allows for two arms on one snoot. With the flexible nature you can easily angle the arms and point them perfectly to highlight the eyes of a subject or two different subjects in one frame, no matter where they are sitting. The only downside here, is that there is no guiding beam or light available, so nailing that position can be challenging, making it not a great choice if you're shooting small fish or other subjects that can move around quickly.
Reefnet Pros
- Fiber Optics allow for flexible arms and good light transmission
- Can use one arm or two for more creative lighting options
- Includes narrowing tip for two size options of light.
- Compact and Lightweight - great for travel
- Durable, no electronics or fragile parts make it nearly indestructable
- Available for a variety of strobes including Sea & Sea YS-D1/D2, YS-01/02/03, YS-250, Inon S-2000, Z-240, and Ikelite DS-160/151
Reefnet Cons
- No aiming or guide light makes positioning difficult
- Longer arm, even with fiber optic means less overall light
- Cost is $300 for strobe mount and one arm, $160 for second arm, so this isn't the cheapest option
Sample Photos with Reefnet Fiber Optic Snoot
These images were taken with the Sony A7R II, Sea & Sea YS-D1. Camera settings, ISO 100, F16, 1/125th with the strobe set to full power. Snoot was set with tip about 5" away from subject, pointing almost directly down, for dual tips they were angled about 45° towards subject.

Reefnet Snoot with Standard Opening

Reefnet Snoot with Narrow Opening (less light transmission)

Reefnet Snoot with Two Arms, Narrow Opening
10Bar Snoot with Laser
 The 10Bar Snoot with Laser is a great tool at an excellent price. Made from machined aluminum this snoot features a guiding laser to allow you to aim the snoot with ease. Simply estimate the distance you'll be from the subject before diving and look through the snoot. Use the thumbscrew to move the laser up and down until its beam falls in the middle of the snoot opening. Then while underwater you should be well lined up to aim and shoot with minimal adjustments. During testing this method worked really well! The 10Bar snoot offers small adjustment to the size of the opening by unscrewing the small tube pieces from the body of the snoot. (note: the Inon version has four stepped pieces, where as the Sea & Sea version only offers one). This can be time consuming, and once unscrewed you'll need to hold the small tube or have somewhere to stash it while shooting. Since this is a basic snoot option that just narrows the light beam through the use of a tube, some power from the strobe is lost, and also if the snoot is not positioned directly above the subject, the beam of light will not be circular, as seen in the photos below.
10Bar Pros
- Easy to aim with guiding laser
- Able to adjust size of light beam
- Small, easy to travel with (though take care to pack well to avoid damaging the laser unit)
- Well priced at $150 for the snoot with laser set.
10Bar Cons
- Laser may not shut off during expsosure, leaving red dot on photo (can be removed in post)
- Requires batteries for laser, battery life only around 10-15 dives.
- Beam is larger, not always circular depening on how snoot is aimed
- Small tube pieces must be unscrewed to change beam size, easy to drop
- Compatible only with Sea & Sea YS-D1/D2 and Inon Z-240, D-2000 and S-2000.
10Bar Snoot Sample Photos
These images were taken with the Sony A7R II, Sea & Sea YS-D1. Camera settings, ISO 100, F16, 1/125th with the strobe set to full power. Snoot was set about 5" away from the subject, angled at about 45° towards the subject.

10Bar Snoot with Large Opening, no diffuser

10Bar Snoot with Small Opening, no diffuser

10Bar Snoot with Small Opening, using included diffuser
Retra Ultimate Light Shaping Device
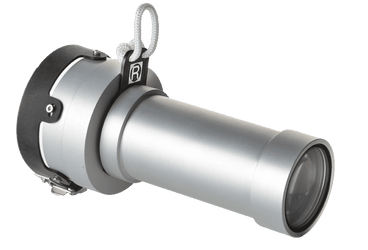
 As evidenced by its name, this is the ultimate in snoot design. More than just a simple masking device to narrow the beam angle, the Retra LSD uses lenses and optical technology to focus the beam angle. In addition special masks with various sized cut outs allow for a number of different light shapes and sizes. Larger than the other options, this snoot features a long tube that uses glass lenses to bend and focus the light to a smaller diameter. Even without any of the masks in place it creates a nice clean circle of light that can be used to snoot your images. While a pain to carry around on the dive, the Retra LSD ships with four different mask options, and there are more available for purchase. The masks included offer 6 different diameter circular openings, three square options and four double circles for creating two pin points of light (great for animal eyes). These simply slide in and click in place and include a lanyard to allow you to clip them to your camera rig or BCD when not in use. The light beam produced is very bright and very clean, making it an ideal tool for the discerning photographer looking to get the most options out of this lighting tool. In addition due to the use of optics, the focus light on your strobe can be used as an aiming tool and works well, providing a small point of light where the brighter beam will fall when you click the shutter release.
Retra Ultimate LSD Pros
- Lens optics create a bright, focused beam of light
- Multiple masking slides allow for a varity of creative lighting shapes
- "Future Proof" - strobe mount is easily removeable and replacment mounts can be purchased so you can use your snoot on any new strobe in the future.
- Easy to aim using your strobe's built in focus light
Retra Ultimate LSD Cons
- Larger than other snoot options
- Glass lenses and internal optics make it slightly more fragile
- Costs more than other options at $379
Retra LSD Sample Photos
These images were taken with the Sony A7R II, Sea & Sea YS-D1. Camera settings, ISO 100, F16, 1/125th with the strobe set to full power. Snoot was about 5" away from the subject, angled at about 45° towards the subject.

Retra Snoot with no shape mask inserted

Retra Snoot with largest of the included circular masks inserted

Retra Snoot with the smallest circular mask inserted

Retra Snoot with narrow dual circular mask inserted

Retra Snoot with the large square mask inserted
Video Reviews:
Reefnet Snoot
10Bar Snoot
Retra LSD
Snoot Comparisson Video
Final Thoughts
All three snoot options work well to produce narrow beams of light for creative macro photography. We've seen incredible results from customers using all of these different options, so can easily recommend any of them. For those not quite sure which way to go, first pick the option that best suits your budget. Next, if you want added flexibility for positioning choose the Reefnet, whose flexible long arms, make perfect tools for lighting those hard to reach critters, or really positioning the light beam. If you want an easy to use set up, go with the 10Bar, whose laser pointer makes it easy to point and shoot the snoot. For the ultimate experience with many sizes and shapes available to create your light beam choose the Retra. Whichever way you go, have fun with your new snoot!
Get the Most Out of your Snoot
Check out these great tutorials from the Underwater Photography Guide to help you really nail the use of your snoot, so you can capture unique, dramatic and engaging images.
http://www.uwphotographyguide.com/underwater-snoot-photo-tutorials


